Friday, 27 September 2013

Camping in the Namib desert..

Continuing with our look at habitats, this week we decided to go camping (sort of).  The decision was made for this to be in the desert, so we set about looking at desert habitats - what they might be like, what we would need to survive, what animals there might be and so on...

We made a few critters to keep us company, he chose to make a dune ant, white lady spider, gecko and side winder snake.  Plus we added a few that we already had...


Luckily as the Namib desert is situated right inside our living room we didn't have to worry about jet lag.  Which meant we could get down to the important business of food: first up toasted marshmallows.


And since we were... err... roughing it and living off the land, we had a good old fashioned 'campfire' to cook our freshly caught main meal.. Not that easy with the wind and slight rain fall... coupled with the fact I'm not all that skilled at cooking over flames...

 
We did have to be careful of the local wild animals..
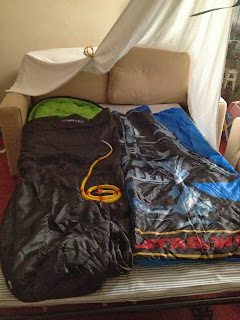
But we did have all the essentials for a (relatively) good night sleep.
Don't worry I moved the snake before we got in...
Not a bad night sleep considering, although I won't be sorry to be back in my own bed tonight..!

Next time it's been suggested we camp in the rainforest on hammocks - I have NO idea how I'm going to make that one happen...


Wednesday, 18 September 2013

All coming together...

Today we have been finishing off all our pirate projects that we started on Monday, in preparation for our pirate party tomorrow.


We made a treasure chest and coins, a map, a telescope, cutlass and hook and some yummy pirate cakes.  I'll try and run through how we made each one..

For the cutlass and hook, these were quite straightforward - the shapes were cut from cardboard (two of each) the 'blades' covered in tin foil, and then the two sides stuck together.  I guess if you had some very strong card you would only need to cut one of each, but I wanted them to be able to withstand a bit of 'use'.  Embarrassing for a pirate to have his sword break in battle..!
The handles were painted brown and then decorated using some shiny craft bits I had for jewels.

The telescope is simply three toilet rolls.  Each one made slightly smaller by cutting up one side and then glueing back together to make a slimmer tube, that way they all fit inside each other and you have a telescopic effect.  These were all painted brown (we had a vat load of brown paint for these crafts!) and decorated with a few stickers.


On to the treasure chest.  For this we used an old shoe box, some card, tissue paper, brown paint (surprise), gold card, tape and glue.

First, for the top of the chest we added some cardboard to make the arch shape on the top of the chest, and stuck with tape.  Then we stuck one long edge of lid to the bottom of the shoe box to make a 'hinge'.

Next we ripped a load of tissue paper up and stuck it all over the box - honestly, I didn't get what this part was all about when I was reading on how to make these, but seeing the finished thing I can see how it adds a lot more texture.

Once the glue was dry, we painted the whole thing in brown paint.

This picture shows how it looks covered in tissue paper.

We used some gold card to make some straps to go over the top of the chest and some stickers I had lying about to make a lock at the front, and for decoration.


This is it looking a bit sad in brown paint, along with the cutlass and hook


And then the finished treasure chest, with a few silver coins - which are basically bits of card with kitchen foil wrapped around them, although we did use blunt pencils to write various numbers on them to denote currency.

Last but not least the treasure map - every good pirate needs one!  We've made treasure maps before, but this time I thought we could try 'ageing' some paper first before we drew them.  Easy enough to do; first take some white paper and tear around the edges, tightly crumple up and then open out flat again. Pour some cold strong tea into a nice big container (out comes our old friend the pet litter tray) and soak for about an hour.  Lift out the paper and lay on some cling wrap, and before it dries add a few grains of instant coffee in places - the coffee gives the paper a slight burnt looking effect.

At this stage I am very conscious that the photo looks like we have just squashed some naan bread - but stick with it because it is a really nice effect.

When it dries we simply added all the details, like a compass, an island or two and most importantly where the treasure is buried....  It's hard to see all the detail in the picture as we used colouring pencils rather than pens.

Oops and I forgot to take a picture of the finished cakes... trust me they look yummy :)


Tuesday, 17 September 2013

Not quite there yet...

We've had a busy week since my last post, lots of the usual Star Wars Maths, Star Wars sudoku (a real hit), writing etc..  We've started writing a story about how Luke becomes a Jedi.
Planning has also started on the Dagobah model.


But this Thursday (19th Sept) is International talk like a pirate day, so I thought we could use this as a little diversion to learn a bit about pirates and do some cool crafts.

Most of these are quite time consuming because of waiting for paint/glue to dry, so we are doing a little everyday to get things ready for a pirate party on Thursday.

So far we have started making a cutlass, a hook, a treasure chest, coins and have started 'ageing' some paper so we can make cool old looking treasure maps.  We're also looking at how pirates talked, what they looked like and a little bit of the history.

Hopefully there will be photos of these later in the week of some of the above - assuming they ever dry that is..!

Thursday, 12 September 2013

Why did the Jedi cross the road..? To prove he wasn't odd...

Today we did a bit of focus on numbers, specifically looking at what makes them odd and even numbers.

The easiest way I found to explain it was play a little game involving Star Wars mini figs.  All the characters have to cross the road from their houses to Mos Eilsey spaceport, the only rule is they must go in pairs - after all you must always hold someone's hand when you cross the road.


If there is a character left behind then it's an odd number, if everyone gets across the road it's even.

We plotted our findings on a number chart, colouring evens in green and odds in red.  Then we were about to see the pattern that shows all odd numbers end in 1,3.5,7,9 and all even in 2,4,6,8,0.


By following this simple rule we were able to look at all numbers, including some very silly long ones like 312,865,685,002 and instantly see whether it was odd/even, just by looking at the last digit.


Wednesday, 11 September 2013

In other non Star Wars related news...

**Warning, this post contains no activities related to Star Wars !!  It really doesn't !! **

Following on from our 'How to draw a scarecrow' activity earlier in the week, and as part of our Autumn project, today we made our own scarecrow.

I was told that we weren't allowed to make him too scary though, in case he scared the chickens :)

This is a great free activity and also loads of fun.  We used; some sticks we picked up on a walk in the woods, an old t shirt that no longer fits, an old pillowcase and some straw - borrowed from the chickens (fresh stuff obviously!).

The sticks were tied together to make a cross, the pillowcase was given a face and then stuffed. then that along with the t shirt attached over the top of the sticks.

We found it easier to stuff the t shirt after we had put it on and tied the bottom, but the head was a lot easy to fill first and then attach.

This is how he turned out:

This was definitely an outside activity, we ended up with straw everywhere!  Including in our hair and all over the garden...  In case you are wondering why he's in a flower pot, well the ground was too dry to 'plant' him and also I suspect he's not very weather proof, so has to be brought inside when the weather changes... currently he's in the conservatory...


Tatooine....

Today we had time to finish our Tatooine model.  Here's our planning and storyboard.


Being a hot desert planet, we of course had to base this on real sand!  We used food containers as buildings and the backdrop (our version of Mos Eisley Spaceport) was made using sponge painting. The buildings are also sponge painted, but I covered them in white tape first so that the paint would stick better.

The figures are all downloads from the internet - I resized them all - this time a bit more realistically :) Some of them I managed to find colouring in versions of, was even better. They're laminated, partly because I love laminating stuff (yes really), but mostly because it helps them to stand up.  The figures are literally just pushed into the sand.


I know we have the Millenium Falcon taking off without it's crew, but it just looks so cool flying off the page that we had to do it.


This was a relatively straightforward 'build', next up is Dagobah - a swampy planet... I suspect won't be quite so easy!  A good opportunity to talk about yet another different type of habitat though.

We've been looking in more detail this week at types of planets/habitats, pairing up key words like 'hot' 'rocky' 'gas giants' etc... and talking about what we know about each one. So far we've done 12 and I've been handed a list for the next four :)


Monday, 9 September 2013

Can you ever have enough Star Wars...?


Today we did:
  • Star Wars maths
  • Star Wars writing
  • Star Wars 'pairs' game
  • Star Wars Alphabet
  • Star Wars, counting in tens
  • Star Wars - what do we know about the planets (looking at types of planets/climates etc)
  • Worked on our Star Wars Tatooine model
  • and a Star Wars game
I though we should have a little break from Star Wars and decided we could learn to draw scarecrows for our Autumn project - great instructions from here: http://www.activityvillage.co.uk/learn-to-draw-a-scarecrow-1

Here's what we did:

You'll notice the lightsaber pitchforks that have been added to someone's scarecrow - it seems you really can't get enough of Star Wars....

What do you do when you run out of shelf space....?

So far we've made Mustafar, Hoth and Endor and half way through Tatooine... The house in starting to run out of shelf space !!

We've come up with a small compromise... not wanting to undo all of the amazing work that has gone into the models, we have condensed them into mini planets.

I found some amazing boxes that were almost build for purpose in Ikea at the weekend, and the best bit is they are stackable!  We've taken a few of the elements from the larger displays, for Endor it was a couple of the Ewoks, one plant and few of the fallen trees (aka twig bits), and I think they look pretty cute.

We just need to re-build mini Mustafar as it got pretty much wiped out in the volcano eruptions :)


Tuesday, 3 September 2013

The Alphabet - our summer project

This little project has been one of my favourites - although I find myself saying that a lot these days so you'll have to forgive me :)

Our mission - to find the alphabet!  Everywhere we went this summer we were on the lookout for letters, which we then took photos of and printed out until we had the whole board covered.

I managed to get a cheap alphabet picture from the 99p shop and we used this as a template.

Great fun watching this build up and a useful exercise in letter placement, as well observation skills - for me too!

Today we finally completed the last few letters and it looks a little something like this

I made a soft copy of all the letter too and made them into a nice printout for him to put on our noticeboard.  I am loving how this looks.


And just in case we need a bit of Star Wars, I have this as a surprise for him too - check out the Star Wars Alphabet:


I looked to find the source website for this and it appears to be broken, so I'm hoping that the pinterest link will work instead: http://pinterest.com/pin/494340496568929258

Monday, 2 September 2013

The Forest Moon of Endor....

I was looking forward to this one... Forests mean trees and plants, which means again we get to experiment with using different materials for making the model.

But first the planning stage:


I love this bit... although it means I have to try and think of how all his excellent ideas can be translated in to something he can make without too much help!

In trying to get as natural a feel as possible we decided to take a trip to the local nursery to pick some plants - I was told very firmly that we had to avoid plants with flowers, as there are no flowers on Endor.   We also made a trip to some nice wooded areas to collect bark, moss and some twigs and we even managed to salvage some nice chunky bit of branch from his Grandad's garden that make excellent tree stumps.  This is how that all looked together:


(yes that's another cat litter tray)

Alpines worked really well, there's one that looks just like a miniature tree - please don't ask me what it's called I'm rubbish with plants!  There are a few herbs here too, like dill and thyme which are very leafy and make great foliage.

Time for my homework.... I was given a list of images to find and print off the internet - thank goodness for Google!  We then stuck them to card for extra strength, cut them out and then laminated them to make them a bit more resilient.
 

So I admit that my scaling for the images was a bit off :)  But I think overall it's not a bad job.
We used lolly sticks to stand the images up, with a bit of blue tack for extra support.


Again I don't think the photos do it justice, plus I'm tempted to make some sort of backdrop for this, maybe using sponge painting.  A great little project this one, where we got to look at different textures, a bit of wildlife and use some creativity. 

Next up: Tatooine